Windows 11 24H2: Cleanup is no longer deleting all temporary files
Windows 11 24H2: Cleanup is no longer deleting all temporary files
Running cleanup after a successful update to a new Windows version allowed you to free up gigabytes of disk space in the past. Windows would remove old update files that it no longer needed and your PC would have several extra gigabytes of storage space as a consequence.
This changed with the release of Windows 11 version 24H2. When you try to clean up after installation of the upgrade, you will notice that Windows 11 retains more than 8 gigabytes of storage.
In other words: this data cannot be deleted. It does not work with the Cleanup tool in Settings, the classic Disk Cleanup tool, or DISM.
Why is that, you may ask. The answer is simple: because Microsoft changed how updates work on Windows 11.
Microsoft changed how updates work in Windows 11 version 24H2
To better understand the change, it is necessary to understand how updates worked prior to Windows 11 version 24H2.
The release version of Windows 11 and feature updates were baselines for updates. Any update that followed was a cumulative update. It included the changes since the release of the baseline version. As you can imagine, this increased over time.
Microsoft introduced so-called checkpoint updates in Windows 11 version 24H2. These establish new baselines for a specific feature update.
The positive effect is that the released cumulative updates are smaller, as they use the more recent baseline as reference. The downside to this is that update data may still be required.
This is happening right now when users notice that they cannot remove gigabytes of update data from their Windows 11 PCs.
The problem right now is that Microsoft is not explaining this. Users see 8.x gigabyte of temporary update data in the cleanup apps, and they wonder why these are not removed when they hit the delete button.
Microsoft is probably going to address this in the future. For now, it is unfortunately looking like a bug to users who experience it.
How to launch the disk cleanup tools
You have several options to launch first-party disk cleanup tools in Windows 11 version 24H2 and earlier.
Settings App Cleanup
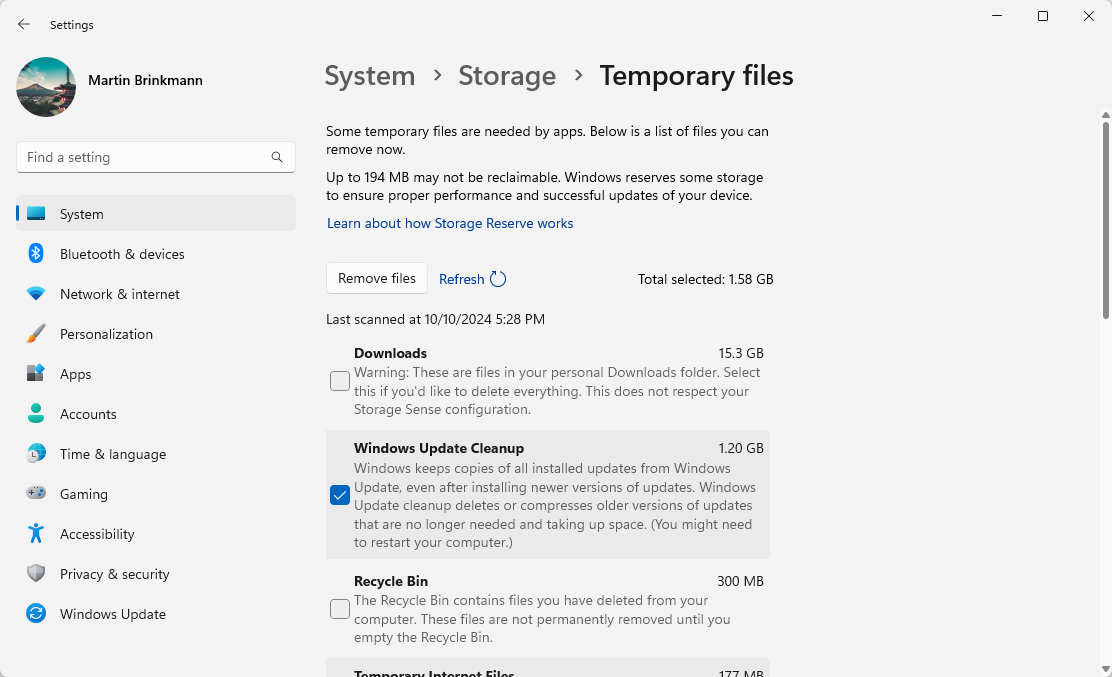
- Open Start
- Select Settings.
- Go to System > Storage.
- Pick Temporary Files.
Windows displays the size of various temporary file types on the system. You may delete none, some, or all of them from here.
Classic Disk Cleanup
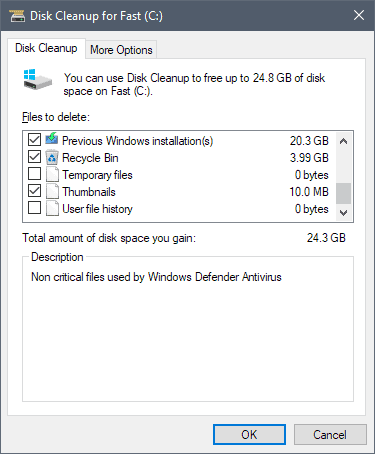
- Open Start.
- Type Disk Cleanup.
- Select the result to launch the tool.
- Make sure drive C: is selected.
- Click ok.
- Activate the button clean up system files.
- Select OK.
You find locations with temporary files listed in the interface. Check the ones you want removed and hit the ok button afterwards to start the deletion.
This tool may be removed at one point, as Microsoft wants that users use the Settings app cleanup tool instead.
What is your take on this? Smaller updates but extra space on the hard drive? Or do you prefer it the other way round? Feel free to leave a comment down below. (via Deskmodder)
More like this
-
Google aims to leave ChatGPT behind with this AI
 Google aims to leave ChatGPT behind with this AIRead more
 -
Google integrates Chat with Gemini option silently into Chrome
Google integrates Chat with Gemini option silently into ChromeRead more
-
The end of Windows 11's Recall AI feature? Microsoft postpones launch
The end of Windows 11's Recall AI feature? Microsoft postpones launchRead more
-
The Windows Windows App is real - replacing Remote Desktop app
The Windows Windows App is real - replacing Remote Desktop appRead more
-
Apple Loses German Antitrust Appeal, Faces Stricter Regulatory Oversight
Apple Loses German Antitrust Appeal, Faces Stricter Regulatory OversightRead more